Stenciling is so much fun, and a great way to give your home an artistic touch. Some of our clients find stenciling super easy, others need a little more time to get familiar with the technique. We keep receiving a lot of questions about how to do it right so that the result would meet the expectations. And this is why we decided to dedicate today’s post to all the tricks and tips for stenciling-from choosing the right tools to wash the stencils afterward. Once you have read these instructions, you can consider yourself a professional at stenciling. And we do want you to enjoy the whole process : )

Stenciling can be a fun weekend DIY to enjoy with your friends:)
1. TOOLS
Choosing the right tools is essential. The right roller and paint will make the painting process twice easier. ROLLER: For the best result, use a short-haired velour roller (lacquer roller, not a paint roller) that would not absorb too much paint. The lacquer roller can be used for stenciling both walls and floors, leaving the perfect thin layer of paint. PAINT: As for the paints, any water-based wall paint will do, as long as it has the right thickness. For walls, Sadolin Bindo 7 (or Sikkens in some countries) has become our favorite, so we dare to recommend it to all our clients. If it is not sold in your country, just seek for water-based wall paint that has the thickness of sour cream. -Floor painting- If you shop in Europe, Sadolin Vatrum is a perfect choice, no matter if you’re painting tiles or wooden floors. Just make sure you add a protective varnish on top. Nb! You can read more about floor painting in our previous post on Painting floor tiles in 12 easy steps. OTHER TOOLS:
- paint tray
- masking tape
- newspapers/carton paper
- damp cloth (in case you get scattered somewhere, and want to wipe it right away as if nothing had happened 🙂
- ladder
- foam brush (for tiny corners that are hard to reach with a roller)
- little paintbrush for correcting the possible mistakes
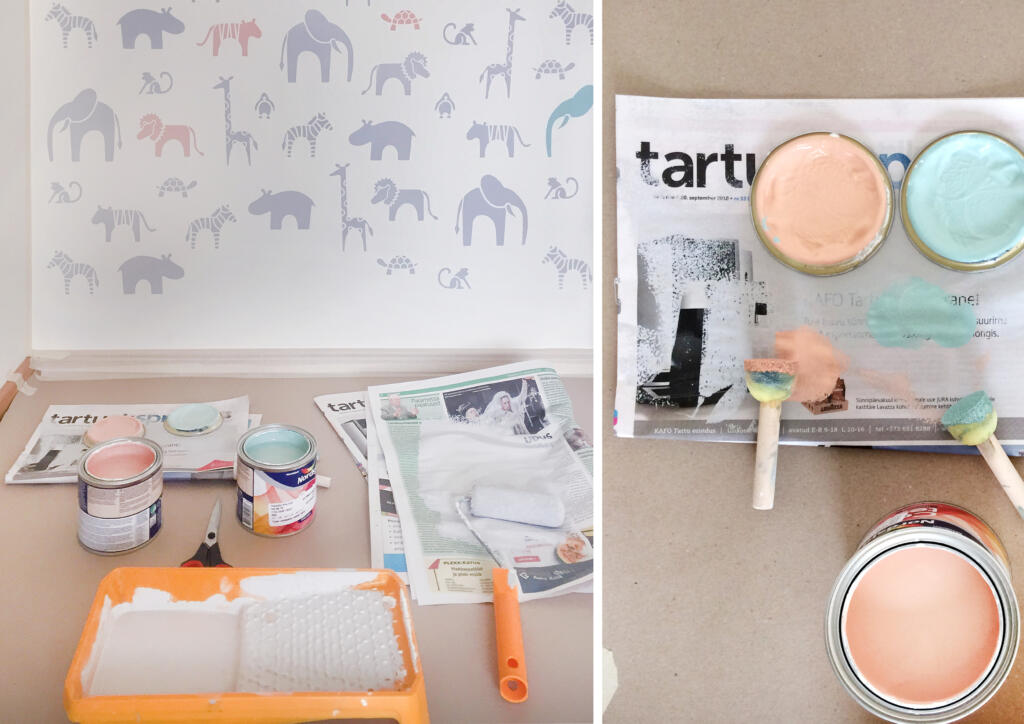
Main tools and tips for stenciling.
2. PREPARATIONS
Before you start painting, make sure the surface is smooth and clean. When stenciling on a textured surface, do not expect the result to be too neat. Also, we recommend covering the edges of the walls, ceiling, and skirting with masking tape. Covering the floor before painting will save you from worrying about paint spills. It is also important to make the pattern start and end at the same distance from both sides of the wall. To get this right, just measure how wide the edge of the stencil is and cover the opposite edge of the wall with a paper tape just as wide. Doing so, the result will be nice and symmetrical.
3. TECHNIQUE
Stenciling is simple and logical if you follow the basic principles of the technique: PAINTING:
- Dip the roller only partially into the paint tray. The paint should cover less than half of the roller. Then roll it on the ramp of the tray to evenly distribute the paint on the roller cover.
- Use an old newspaper or kraft paper to remove excess paint and even the paint on the roller even more. Ps! The only mistake you can make when stenciling is to use too much paint!
- Cover the stencil with the first thin layer of paint. The first coat may be semi-transparent, it is just as it should be. PS! A thin coat of paint is very important to achieve the ideal outline, as it allows you to put more pressure on the roller when painting small details.
- After a few minutes when the first coat is almost dry, apply a second thin coat. Two thin coats of paint will leave a beautiful, even finish.

Before painting, remove excess paint on a piece of paper.

Tips for stenciling: painting is simple when using just a small amount of paint and a lacquer roller. REPOSITIONING: It is possible to reposition the stencil immediately. Just make sure that no tape is applied to the freshly painted surface. Identifying connection points is not difficult as each corner of the stencil has a repetitive motif that can easily be aligned with previously painted parts.

Repositioning the stencil is quick and easy.
4. TIPS FOR STENCILING FASTER:
- The room should be warm as a higher temperature makes the paint dry much faster. If you are in a hurry, a portable heater can also be quite helpful.
- To avoid waiting for the paint to dry before repositioning the stencil, we recommend repositioning horizontally and vertically, in turns. This means that if your first repositioning is to the right, the next one should be below the firstly painted area. Next repositioning should be back to the right, and the following down again. Continuing to do this in turns will allow the painted surface to dry before you get back to it:)

If you want the painting process to be even faster, use 2 stencils. Plus, this way you may not need to wash the stencils until the end.
5. TIPS FOR STENCILING THE TRICKY PARTS:
Objects such as skirting boards, socket covers, and radiators can make the painting process a lot more complicated. To make the job easier, remove any obstacles that can be removed, such as curtain rods, switch and socket covers. This little extra move may be annoying but certainly worth the effort as painting around these tiny details can be a nightmare. For non-removable items, we recommend painting the large areas first, without paying attention to the tricky parts at first. Once the easy part is done, you can complete the work with small extra stencils that come with the package. For example, if you are painting a wall that has a radiator then paint the easy parts first and leave the radiator area for the last. Most probably your roller doesn’t fit behind the radiator. If so then just use masking tape to create a frame on the wall around it, as close as possible. Then paint the wall until it meets the masking tape. Once you have done so and removed the tape the pattern ends in a straight line just before the object and the result looks neat and tidy. Door and window skirtings: What comes to painting around windows and doors, your best tool is masking tape. To make the pattern meet the skirting on a straight line, it is wise to place narrow masking tape on the wall around the skirting. This way the pattern will end on a perfect line around the skirtings and other objects you can not remove before painting. Once you reach near the baseboard or floor line after stenciling your wall, secure your stencil on the upper part and leave the part of the stencil that is on the baseboard or floor hanging free. Don’t worry if the stencil seems too loose- if your roller is dry enough, it will press the stencil against the wall and the paint will not bleed.

Finishing the pattern correctly before window skirting.

Painting close to the floor: leave the stencil hanging free so that you can use your fingers to support it while stenciling. This way the stencil is more flexible and you will get a better result.

If there are parts that are difficult to reach, just leave them for the end and use the little extra piece to bring your accent wall to perfection.

The stencil is flexible enough to paint the corners.
6. CLEANING THE STENCIL
Washing the stencil is always a part of the stenciling process. If the painted pattern does no longer seem neat and the outlines become “hairy”, it’s time to wash the stencil. You can usually paint 7-8 times before it’s time to clean it. When washing, the most important thing is to use warm water as it dissolves paint quick and easy. Our stencils are quite large, which is why it’s reasonable to wash them in a bathtub or shower, using just a dish brush. Note that the stencil needs washing on both sides, and drying completely before it can be reused! PS! If you feel a need to wash your stencil, do it right away. It is so much harder to get them clean once the paint is dried off.

Washing the stencil is easy. Now that you have learned all the tips for stenciling, you can paint like a pro:) And, if you need any more information, just check our video tutorials.